Tuesday, July 7, 2015
Friday, April 3, 2015
Themed, colored, Easter Eggs!
So this isn't necessarily a recipe/ or a diy craft ..however, it was so much fun and worth the effort to do!
My sister, husband, and I had some free time yesterday (it snowed here in Colorado so we were stuck up the mountain and inside the comfort of our warm house). We decided to hard boil some eggs and get to coloring!
I had some ideas in mind;
For some reason I ALWAYS need to "do better' than last year"... I sometimes screw myself over by trying to one up myself every year. This year, though, my choices were simple but time consuming.
__
The Adipose have the TARDIS!


The chicken has flown the coop!


(...something clever about strawberries because my husband and I couldn't agree on a title)


My sister, husband, and I had some free time yesterday (it snowed here in Colorado so we were stuck up the mountain and inside the comfort of our warm house). We decided to hard boil some eggs and get to coloring!
I had some ideas in mind;
For some reason I ALWAYS need to "do better' than last year"... I sometimes screw myself over by trying to one up myself every year. This year, though, my choices were simple but time consuming.
__
The Adipose have the TARDIS!
The chicken has flown the coop!
(...something clever about strawberries because my husband and I couldn't agree on a title)
And that ends the fun! I can't wait til next year so I can outdo myself again!
Enjoy the holiday :)
Wednesday, February 4, 2015
How to make a heart shaped cake!
What you need;
- 8in/ 9in square pan
- 8in/ 9in circle pan
- Desired cake mix and frosting
What to do;
- Make your cake as directed by the directions
- Split the batter between a square pan and a circle pan, then bake as directed by the 8in/ 9in pan instructions

- After baking is finished, let both cakes cool completely
- Cut the circle cake in half, and place each half like so;


- 8in/ 9in square pan
- 8in/ 9in circle pan
- Desired cake mix and frosting
What to do;
- Make your cake as directed by the directions
- Split the batter between a square pan and a circle pan, then bake as directed by the 8in/ 9in pan instructions
- After baking is finished, let both cakes cool completely
- Cut the circle cake in half, and place each half like so;
- Put the cakes on your serving plate and frost
Frosting fudge.

I've been doing this for a couple of years now. It is the most easy way that I personally know how to make a quick and tasty fudge.
What you need;
- 1 can of frosting (flavor is up to you.. I used cherry)
- 1 bag chips (I used dark chocolate)
- Greased 9x13 pan
What to do;
- Melt (your chosen flavor of) chips in either a double-boiler or in the microwave. *..if using the microwave, melt in 15- 30 second intervals*
- Combine the frosting with the melted chocolate,
- Transfer to the greased pan then let it sit til hardened (if you are in a rush, you may place it in the fridge to harden)

Monday, October 13, 2014
Mint Oreo Truffles.

What you need;
- 1 package of Mint Oreos
- 8oz cream cheese
- Melting chocolate (I used chocolate chips and vanilla flavored almond bark with a splash of green food dye)
What to do;
- Put your Oreos into a food processor (the wafers, including the mint filling) and blend until your cookies are in crumbs.
- Mix your crumbs and the 8oz of cream cheese together (I used an electric mixer) until your mixture is smooth. Then refrigerate for up to 30min.
- Remove the from the fridge and scoop out 30-35 tablespoon sized balls, then freeze until firm (about 1 hour).
- Melt your chocolate chips and/ or almond bark (I used a double-boiler for the chocolate chips and did only a few squares of almond bark in the microwave at a time, as it is easier to coat when it's warm).
- Dip each ball with a fork (I kept the balls in the freezer and took them out to dip one at a time.. it is much harder to dip and coat when the balls begin to unfreeze). Let the chocolate harden and keep refrigerated.


Sunday, October 12, 2014
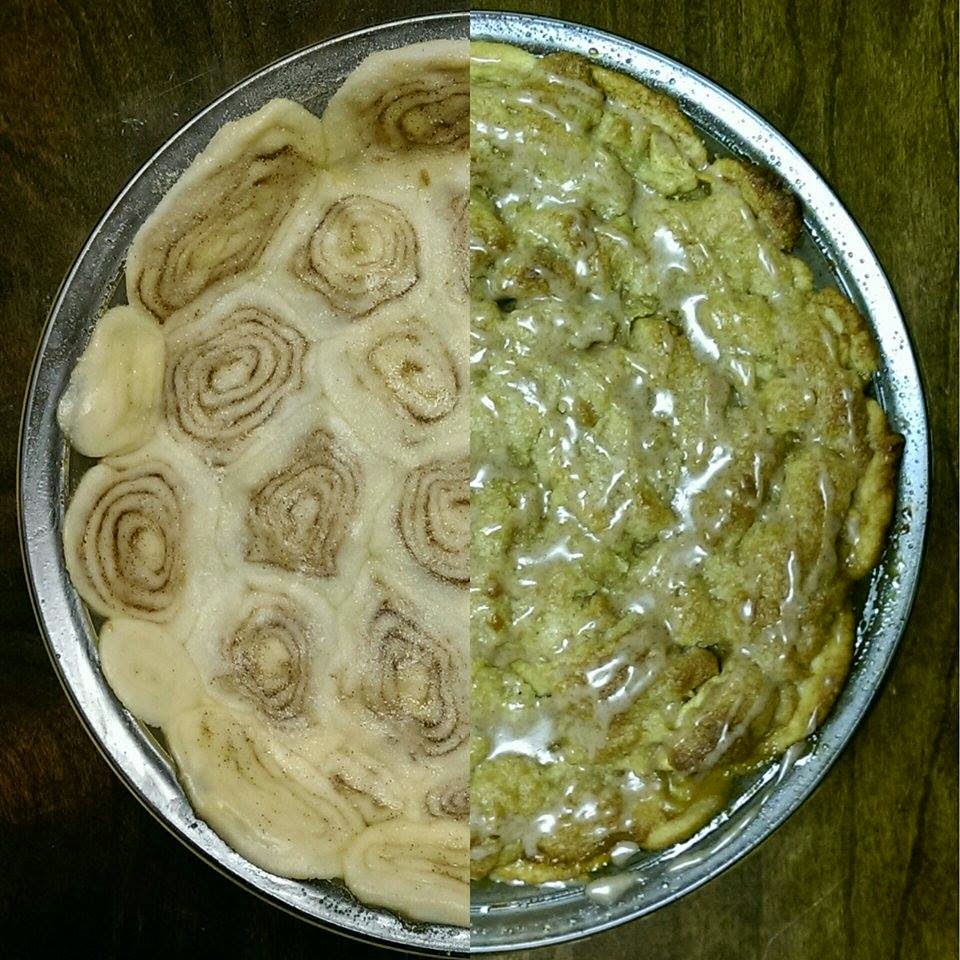
Dutch Apple Pie with a Cinnamon Roll crust.

What you need;
For the crust.
- Refrigerated pie crust
- 1 tablespoon butter (melted)
- 2 teaspoons cinnamon
- Egg wash
For the pie.
- At least 12 small- to medium sized apples (I mixed Gala with Granny Smith) to equal 7- to 8 cups peeled, cored and thinly sliced apples
- 1 stick butter (1/2 cup)
- 1 cup flour
- 1 cup brown sugar
- Sugar (granulated, to sprinkle)
For the icing (not necessary, but yummy)
- 1/4 teaspoon vanilla
- 1/4 teaspoon ground cinnamon (I added a 'bit' more than the recommended amount)
- 2 teaspoons milk
- 1/2 cup powdered sugar
Other random stuff.
- Mixing bowl
- Sharp knives (to peel/ and cut your apples)
- Glass pie plate
-
-
What to do;
- Lightly flour a clean surface to place your unrolled pie crust on. Brush the entire surface of the crust with butter and sprinkle with the cinnamon. Tightly roll it back up, then slice into rounds (about 1/2 in. width).
- Place (what will look like) mini cinnamon rolls into the bottom and sides of your glass pie plate. Gently press them together while making sure you haven't left any cracks. Lightly brush some of your egg wash onto the crust.


- In your mixing bowl, combine the butter, flour and brown sugar into crumbles (you can use your fingers). Put your sliced apples in the center of the crust and sprinkle the crumbles over top of the mound.
- Bake in a 400 F preheated oven until the filling is bubbling and the top crust is a golden brown (about 40-45 minutes is what is recommended, however I checked at 35 minutes and mine was golden and bubbly). If you are worried about your top crust getting too dark, put some foil over it. Remove from oven and cool on a cooling rack.
- If you are going to add the icing; whisk together (in a small bowl) the powdered sugar, vanilla, cinnamon and milk to form icing (to reach desired consistency, add more milk or sugar). Pipe on the icing in a swirl on the fully cooled pie.

- Plate. Add ice cream! Enjoy!


Tuesday, July 1, 2014
American flag cake.
I've been really busy spending time with my family. I'm sorry I've been slacking, lol.
What you need;
- White cake mixes
- Blue and red food coloring
- 2 cans of white icing
- 9in. circle pan (I use aluminum foil in the pan with the spray butter for an easier and cleaner way to get the cake out of the pan)
What to do;
- Mix your cakes according to the directions you have. Add the food dye to 'your' desired color of red and blue. (I used a box of blue velvet, a box of red velvet, and a box of french vanilla cake mix to make it easier)
- For each circle, I used 3 heaping scoops of a 1/4c measuring cup. But for the blue I doubled it and used 6 heaping scoops of the same measuring cup.
- You will end up with 3 red, 1 double blue, and 2 white cakes.
- With the measurement of your cake pan in mind, draw and cut out a circle that is 1 1/2 - 2in from the edge of the cake.
- After your cakes have cooled completely on a cooling rack, (you may also place them in the fridge for 30min- 1hr) cut the tops of the cakes to make them flat and even. Remember that the blue cake circle is double, so stack the red cake circle and the white cake circle that you will be using for your smaller circles on top of each other to see how tall your blue circle needs to be. Then begin cutting the circles from the stencil that you made.
- As seen in the picture below, you will have 2 full red cake circles and 1 small red cake circle. 1 outer ring of your double blue cake circle. 1 full white cake circle and 1 small white cake circle.
- Begin your assembly process.
- Start with a full red,
- ice the top of your red,
- then add your full white,
- ice the top of your white,
- then add your last full red,
- ice the top of your last red,
- (make sure your small white and small red fit into the center of your blue before you do the next steps)
- then carefully add your blue outer edge
- then add your little small white circle,
- ice the top of your small white circle,
- then add your small red circle.
- Frost the rest of your cake (I placed my cake in the fridge for 30min before I frosted the rest of my cake. If you find that the cake is breaking/ ripping while you are frosting, place it in the fridge)
-Enjoy!
Subscribe to:
Posts (Atom)